Vergeling van UV-geharde coatings?
Hallo allemaal, ik ben Starry. Ik werk al meer dan tien jaar in de chemische materialenindustrie en breng mijn dagen door met UV-geharde coatingsharsen en fotoinitiatoren. De bekers in het lab en de coaters op de productielijn zijn als oude vrienden voor me.
Het artikel van vandaag gaat niet over abstracte theorieën. Het gaat over het oplossen van je meest urgente probleem in de echte wereld...het vergelen van UV-geharde coatings. Of u nu een formuleringschemicus, productietechnicus of inkoop-/QC-specialist bent, als u dit leest, begrijpt u de onderliggende chemische logica van vergeling, kunt u 90% veelvoorkomende valkuilen vermijden en direct bewezen oplossingen toepassen om uw producten kristalhelder en duurzaam te houden.
I. De realiteit onder ogen zien: Vergeling is niet alleen een "cosmetische fout", het is een chemisch "waarschuwingssignaal".
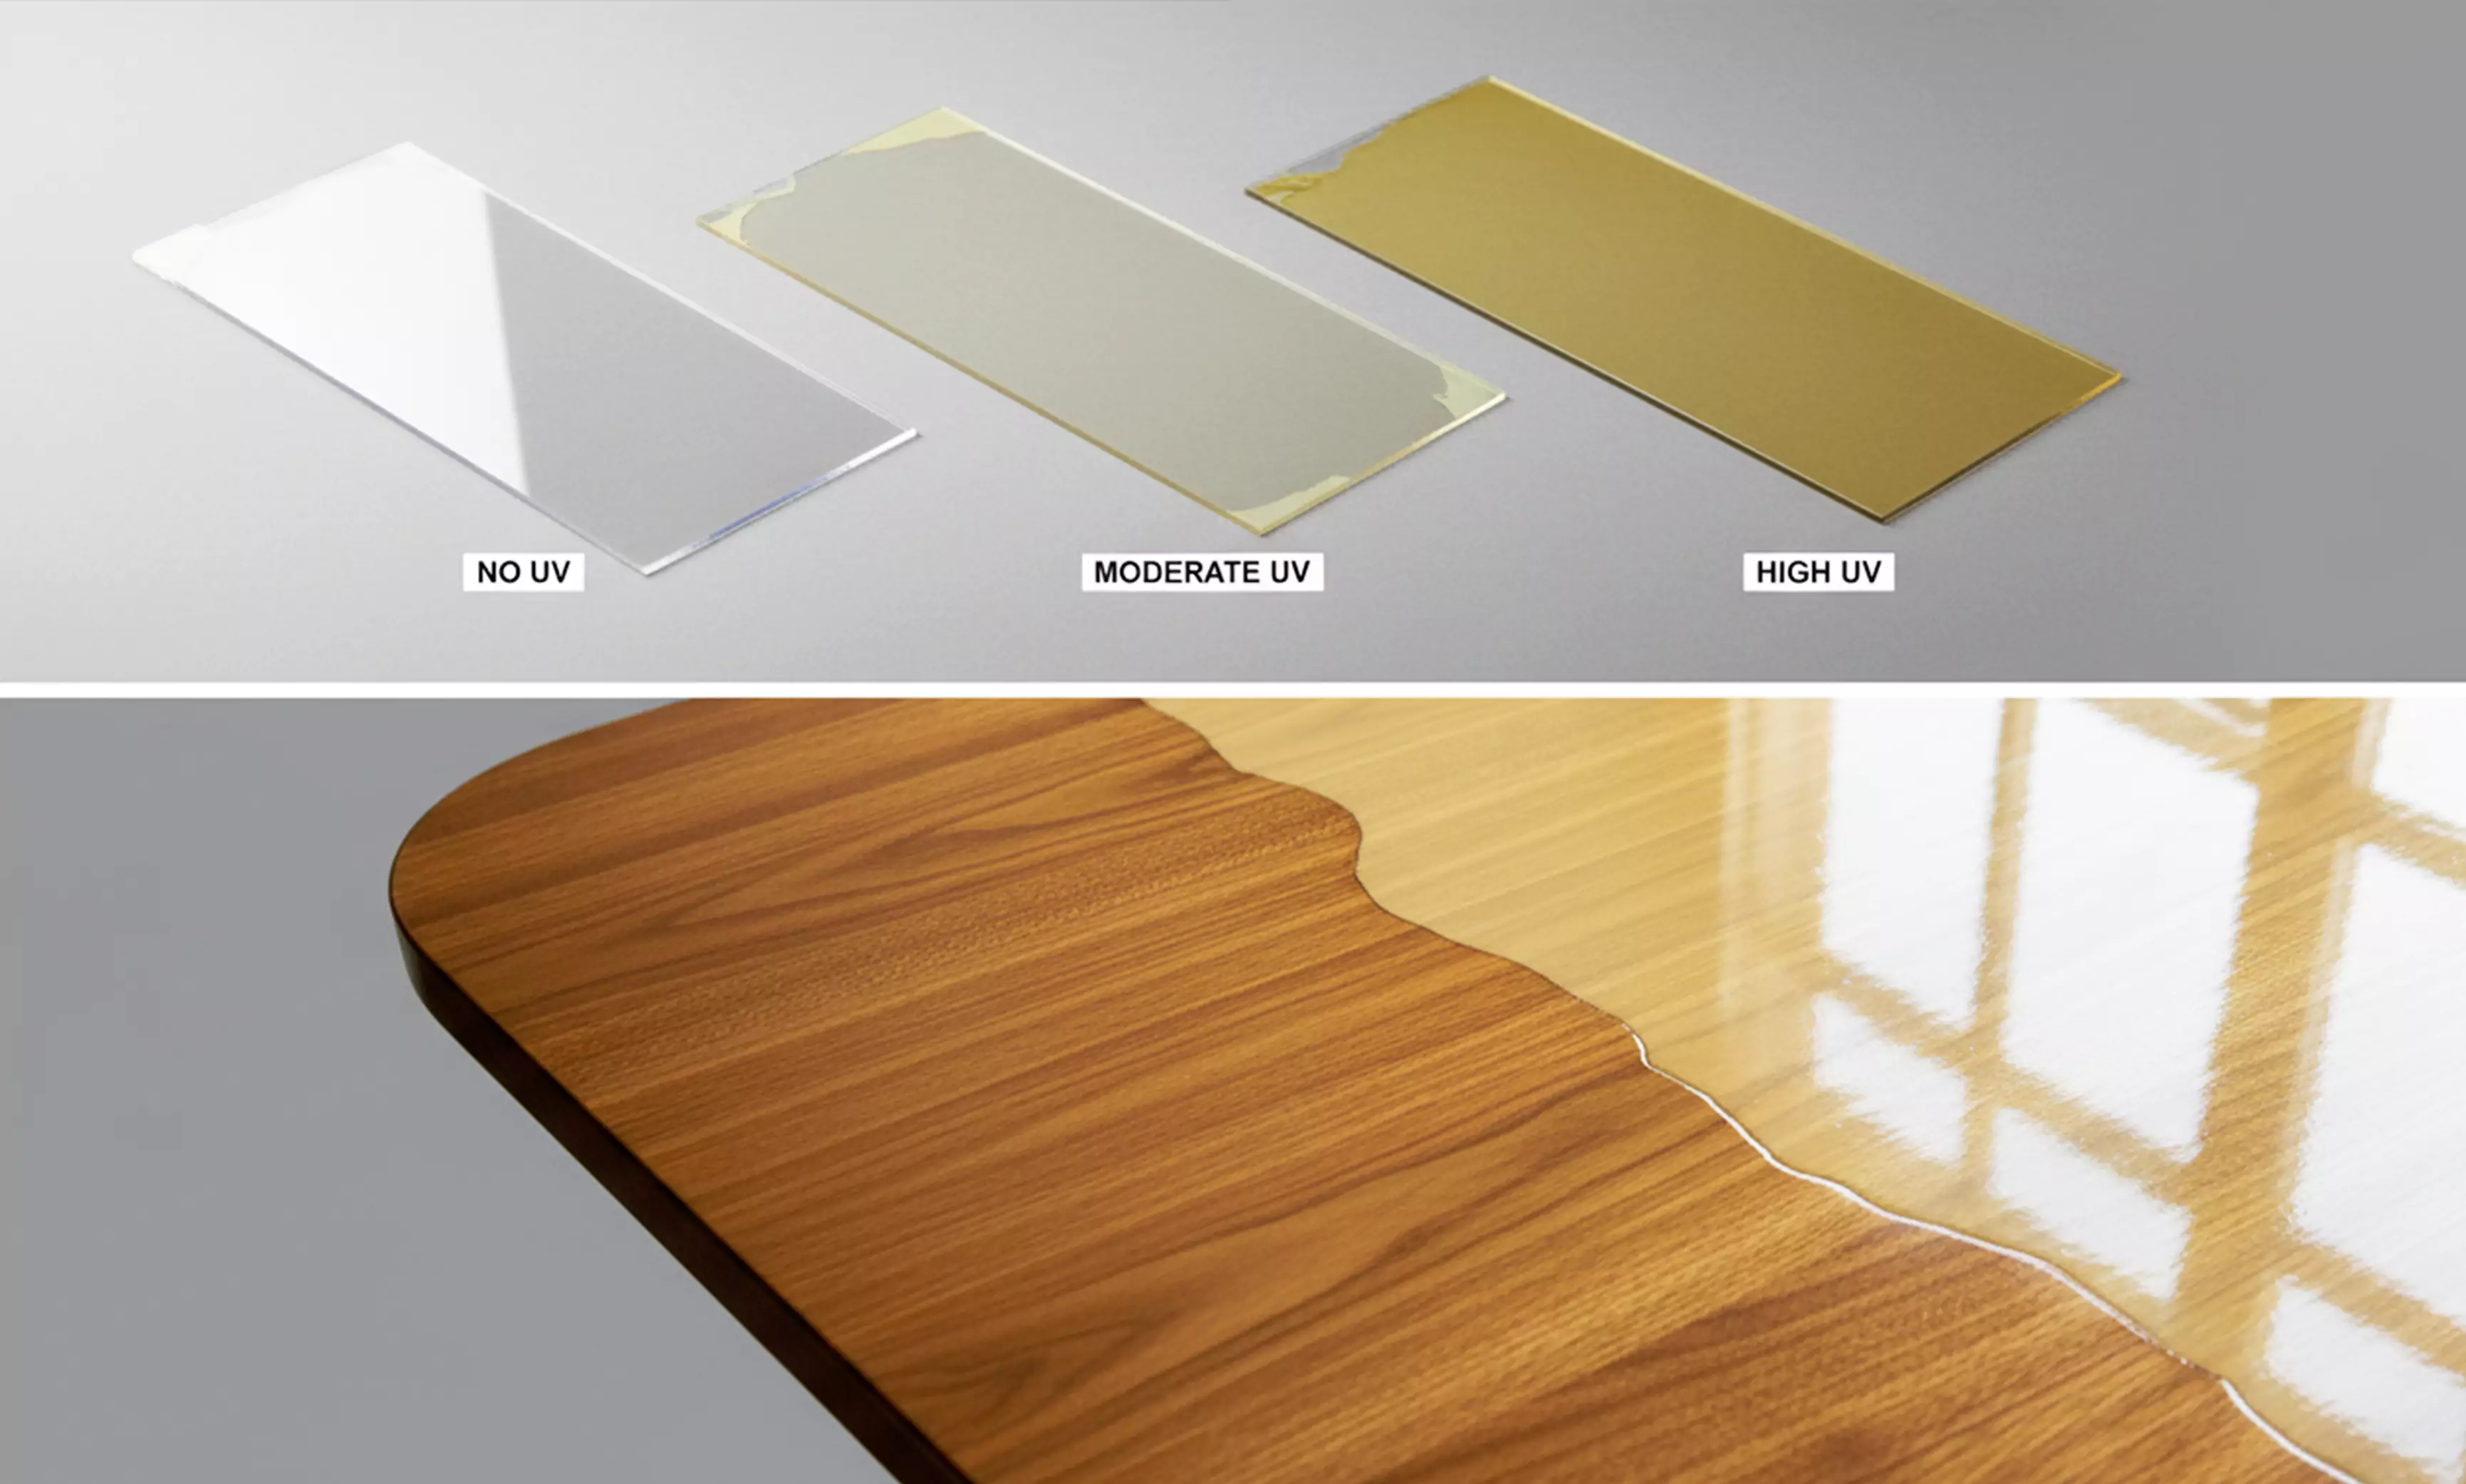
We hebben het allemaal wel eens meegemaakt: dat moment van frustratie als een perfect heldere, glasachtige coating na een paar dagen geel wordt. Erger nog, klantenfeedback zegt: "Uw product vergeelt na 3 maanden, wat een impact heeft op onze verzendingen."
Velen zien vergeling alleen als een "esthetisch probleem", maar dat is een misvatting. Vergeling is een zichtbaar teken van chemische afbraak binnen de coatingmatrix onder externe spanning. Het wijst op een kettingreactie van polymeerbindingbreuk en chromofoorvorming.
Ik herinner me een project voor een elektronicaklant die coatings voor optische lenzen maakte. De laboratoriumtests waren perfect, maar massaproductie resulteerde in vergeling, met aanzienlijke verliezen tot gevolg. De boosdoener? Slechte ventilatie in de werkplaats zorgde ervoor dat atmosferische NOx kon reageren met aromatische amines in de coating. Dit benadrukt een belangrijke les: om vergeling op te lossen, moet je zowel de formulering en de werkomgeving.
Vergeeling is vooral kritisch bij toepassingen met hoge prestaties:
-
Optische apparaten (lenzen, spiegels): Vergeling vermindert de lichttransmissie, wat ten koste gaat van de beeldkwaliteit.
-
Elektronica (telefoonbehuizingen, schermcoatings): Verkleuring maakt het uiterlijk van het product goedkoper, wat leidt tot klachten van klanten.
-
3D printenHoogwaardige verpakking: Langdurige blootstelling aan licht/warmte leidt tot vergeling, vermindert de prestaties en verkort de levensduur van het product.

Laten we beginnen met een kernconcept: De essentie van vergeling is de vorming van "chromoforen".-verbindingen die zichtbaar licht absorberen (in het geelbruine spectrum). Zodra deze zich vormen in de coating, treedt vergeling op. Er zijn vijf primaire routes voor het genereren van chromoforen, die we hierna zullen ontleden.
II. Analyse van de hoofdoorzaak: 5 vergelingsmechanismen met voorbeelden uit de praktijk
Veel formuleerders worstelen omdat ze weten dat het vergeelde, maar niet waarom. Verschillende mechanismen vereisen compleet verschillende oplossingen. Op basis van jarenlange experimenten en productie-ervaring heb ik de vijf meest voorkomende mechanismen onderverdeeld met echte gevallen om je te helpen snel een diagnose te stellen van je probleem.
1. Oxidatieve afbraak (auto-oxidatie): De meest voorkomende boosdoener (>60% van de gevallen)
Dit is de meest voorkomende oorzaak. Simpel gezegd: onder de gecombineerde invloed van zuurstof, UV-licht en warmte ondergaat de coating een kettingreactie van vrije radicalen, waarbij uiteindelijk geconjugeerde carbonylverbindingen (aldehyden, ketonen) worden gevormd. Dit zijn de primaire boosdoeners die verantwoordelijk zijn voor vergeling.
Ik heb een vergelijking gemaakt: dezelfde UV-coating werd 24 uur lang blootgesteld aan UV-licht, één in een zuurstofomgeving en één in een stikstofomgeving. De zuurstofgroep vergeelde aanzienlijk; de stikstofgroep bleef vrijwel onveranderd. Dit toont duidelijk de katalytische rol van zuurstof aan.
Vereenvoudigde reactieroute:
-
Initiatie: UV/Hitte zorgt ervoor dat polymeerketens (RH) breken, waarbij vrije radicalen (R- + H-) worden gevormd.
-
Voortplanting: Radicalen combineren met zuurstof om peroxy radicalen (ROO-) te vormen, die vervolgens reageren met het polymeer om hydroperoxiden (ROOH) te vormen.
-
Ontleding: Hydroperoxiden breken af en vormen alkoxyradicalen (RO-) en hydroxylradicalen (-OH).
-
Chromofoorvorming: Alkoxy radicalen reageren verder om geconjugeerde carbonylverbindingen (aldehyden, ketonen) te genereren, wat vergeling veroorzaakt.
Belangrijkste afhaalmaaltijd: Dit type vergeling is "progressief", van licht tot diepgeel in de loop van dagen of maanden. Komt vaak voor bij UV-coatings die buiten worden gebruikt.
2. Fotochemische reactie (foto-oxidatie): De "achilleshiel" van aromatische harsen
Als je aromatische harsen gebruikt zoals bisfenol-A epoxyacrylaten, let dan goed op. UV-licht induceert direct bindingsbreuk in de hars, waarbij chinonen of fenoxy radicalen worden gegenereerd. Deze stoffen zelf zijn sterke geelbruine chromoforen.
Een gedenkwaardig geval: we hielpen een verpakkingsklant wiens PET-verpakkingsfolie, gemaakt met bisfenol-A epoxyacrylaathars, na slechts 3 dagen blootstelling aan de zon geel werd als een oude krant. We schakelden over op een alifatische hars en onder dezelfde omstandigheden was er bijna geen vergeling, zelfs niet na 7 dagen.
Typische reactie (met bisfenol-A epoxyacrylaat als voorbeeld):
UV-straling veroorzaakt waterstofonttrekking van de ArOH (aromatische hydroxyl)-groep in de hars, waarbij ArO- (fenoxy)radicalen worden gegenereerd. Deze herschikken zich vervolgens tot p-chinon methide-een klassieke gele chromofoor. Zelfs sporen veroorzaken merkbare vergeling.
3. Amineoxidatie (NOx-reactie): De "onzichtbare moordenaar" die vaak over het hoofd wordt gezien in werkplaatsomstandigheden
Dit type vergeling is verraderlijk en wordt vaak verward met hars- of initiatorproblemen. Het is eigenlijk een "milieu + formulering" probleem: aromatische amines (gebruikt als synergisten of co-initiatoren) in de coating reageren met stikstofoxiden (NO, NO₂) in de lucht om nitroso en nitro derivaten te vormen, die diep gele verbindingen zijn.
Bij de eerder genoemde klant van elektronica was dit precies het geval: de werkplaats bevond zich in de buurt van een verwarmingsketel, NOx van de verbranding kon niet goed worden afgevoerd en de coating bevatte een aromatisch amine zoals diethyleentriamine (DETA). De reactie veroorzaakte snelle vergeling. We vervingen het door een alifatische amine en verbeterden de ventilatie - probleem opgelost.
Kernreactie: ArNH₂ (aromatisch amine) + NO₂ (stikstofoxide) → ArNO₂ (nitroderivaat) + H₂O. Het nitroderivaat is de belangrijkste chromofoor.
4. Thermische degradatie: Een belangrijk probleem in omgevingen met hoge temperaturen
Hitte versnelt de afbraak van de polymeerruggengraat, initiatoren of additieven. Dit genereert geconjugeerde olefinen of veroorzaakt Maillard-type reacties, wat uiteindelijk leidt tot vergeling. Komt vaak voor bij uitharding bij hoge temperaturen, blootstelling aan hitte buiten of producten die langdurig hittebestendig moeten zijn (bijv. coatings voor auto-onderdelen).
Ik ben ooit een UV-coating voor het interieur van een auto tegengekomen die direct vergeelde tijdens het uitharden in de oven (temperatuur hoger dan 80°C). Onderzoek wees uit dat de hoge temperatuur ruggengraatsplitsing veroorzaakte, waarbij onverzadigde aldehyden en diënen (chromoforen) werden gevormd, en ook Maillard-reacties tussen carbonyls en amines op gang bracht, waarbij bruingele pigmenten ontstonden.

Twee belangrijke routes voor thermische afbraak:
-
Ruggengraat splitsing: De hoofdketen van het polymeer breekt, waardoor chromoforen zoals onverzadigde aldehyden en diënen ontstaan.
-
Maillard-type reacties: Carbonylgroepen reageren met amines in de coating en produceren bruingele pigmenten.
5. Additieve migratie/decompositie: De "onschuldige" boosdoener
Bij het aanpassen van formuleringen richten veel mensen zich alleen op harsen en initiators en zien ze additieven over het hoofd. Resterende fotoinitiatoren, antioxidanten of stabilisatoren kunnen naar het oppervlak migreren of afbreken na uitharding, waardoor gekleurde bijproducten ontstaan (vooral aromatische stabilisatoren), die vergeling veroorzaken.
Ik heb bijvoorbeeld eens een goedkoop aromatisch antioxidant gebruikt in een UV-coating. Aanvankelijk ging het prima, maar na een maand verscheen er een lichte vergeling op het oppervlak. Uit analyse bleek dat de antioxidant was afgebroken en aromatische fragmenten vormde die migreerden. Overschakelen op een alifatische antioxidant loste het probleem voorgoed op.
III. Praktische oplossingen: Een allesomvattende aanpak van formulering tot arbeidsomstandigheden
Inzicht in de mechanismen geeft je richting. Op basis van jarenlange praktijkervaring heb ik een combinatiestrategie samengesteld van "formuleringsaanpassing + procesoptimalisatie". Elk punt is geverifieerd in het laboratorium en aan de productielijn.
1. Kies de juiste fotoinitiator: Geef de voorkeur aan niet-vergelende soorten (top 3 aanbevelingen)
Veel problemen met vergeling komen voort uit het afbreken van initiatoren in gekleurde bijproducten. Traditionele aromatische fotoinitiatoren zijn hier gevoelig voor. Initiators die niet vergelen en schoon afbreekbaar zijn, minimaliseren het probleem vanaf het begin.
Gebaseerd op uitgebreid gebruik, zijn hier mijn top 3 aanbevelingen (met een balans tussen prestaties en kosten), met toepassingsscenario's:
-
PI-TPO (ethyl(2,4,6-trimethylbenzoyl)fenylfosfinaat): Meest veelzijdig. Werkt goed in transparante, dikke en gepigmenteerde systemen. Breekt af zonder gekleurde bijproducten te vormen, minimale vergeling op lange termijn. Mijn huidige werkpaard.
-
PI-TPO-L: Vloeibare vorm van TPO, weinig geur. Ideaal voor geurgevoelige toepassingen (elektronica, voedselverpakkingen). Snelle uitharding, vergelingremming vergelijkbaar met TPO.
-
PI-819 (Bis(2,4,6-trimethylbenzoyl)-fenylfosfineoxide): Topkeuze voor hoogwaardige toepassingen. Beste antivergelingsprestaties, geschikt voor optiek en hoogwaardige elektronica. Iets duurder maar uitstekende waarde vergeleken met vergelijkbare high-end opties.
Vermijden: Blijf uit de buurt van initiators op basis van acetofenonen (bijv. BP - benzofenon). Ze zijn gevoelig voor degradatie en vergeling, vooral problematisch in transparante systemen.
2. Vermijd aromatische aminen: Vervang door alifatische amines of gebruik aminevrije systemen.
Zoals de amineoxidatiezaak liet zien, zijn aromatische amines (bijv. DETA, EDA, gesubstitueerde anilines) grote risico's voor vergeling, vooral in slecht geventileerde werkplaatsen waar ze reageren met NOx.
Praktisch advies:
-
Prioritaire vervanging: Vervang aromatische amines door alifatische, zoals triethanolamine of dimethylethanolamine. Deze zijn minder gevoelig voor oxidatie en vormen geen gekleurde bijproducten.
-
Volledig verwijderen: Als de formulering het toelaat, gebruik dan een aminevrij fotoinitiatorsysteem. Dit is de veiligste aanpak, vooral voor hoogwaardige transparante coatings.
3. Lichtstabilisatoren toevoegen: De "UV-absorber + HALS" dubbele beschermingscombinatie
Zelfs na uitharding worden coatings aangetast door UV-licht. Alleen vertrouwen op hars en initiator is onvoldoende voor langdurige weerstand. Voeg UV-absorbers (UVA) en Hindered Amine Light Stabilizers (HALS) toe voor dubbele bescherming.
Mijn beproefde "Golden Combo":
-
UV-absorber: "Blokkeert UV-licht en voorkomt directe bestraling van de hars. Aanbevolen Tinuvin® 400, Tinuvin® 384-2 (voorbeelden van Ciba/BASF-producten). Goede compatibiliteit, tast de transparantie niet aan.
-
HALS: "Ruimt vrije radicalen op en stopt de kettingreactie van oxidatieve afbraak. Aanbevolen Tinuvin® 292, Chimassorb® 944 (voorbeelden van Ciba/BASF-producten). Goede hittebestendigheid, geschikt voor uitharding bij hoge temperaturen.
Doseringsgids: Over het algemeen UVA bij 0,5%-1,5%, HALS bij 0,3%-1,0%. Aanpassen op basis van filmdikte en toepassing - verhogen voor dikke films, verlagen voor dunne films om de uithardingssnelheid niet te beïnvloeden.
4. Harsen vervangen: Geef prioriteit aan alifatische en cycloalifatische soorten
Als je product wordt blootgesteld aan langdurige blootstelling aan de buitenlucht, hoge temperaturen of intense UV-straling, is de keuze van de hars cruciaal. Aromatische harsen (op basis van bisfenol-A, TDI) bevatten inherent chromofore precursoren en zijn gevoelig voor foto-oxidatieve vergeling. Alifatische en cycloalifatische harsen, zonder aromatische structuren, bieden 3-5x betere weerstand.
Aanbevolen harsen (in volgorde van voorkeur):
-
Alifatisch polyurethaanacrylaat: De beste keuze. Gebaseerd op IPDI of HDI, met uitstekende weerstand, weersbestendigheid en transparantie. Ideaal voor de meeste hoogwaardige toepassingen (optiek, elektronica, auto's).
-
Alifatisch polyesteracrylaat: Beste waarde. Goede antivergelingsprestaties, geschikt voor verpakkings- en 3D-printen in het midden- tot hogere segment.
-
Cycloalifatische epoxyhars: Geschikt voor toepassingen die een hoge hittebestendigheid en hardheid vereisen. Goede antivergelingsfunctie, maar langzamere uithardingssnelheid; kan worden gecombineerd met TPO initiator om uitharding te versnellen.
5. Optimaliseer de uithardingsomstandigheden: Volledige uitharding is essentieel om "restrisico's" te vermijden
Een vaak over het hoofd gezien detail: een onvolledig uitgeharde coating laat restmonomeren en vrije radicalen achter. Deze resten oxideren gemakkelijk, wat leidt tot vergeling - zelfs als je de juiste ingrediënten hebt gekozen, kan een onjuiste uitharding problemen veroorzaken.
Mijn praktische optimalisatietips (bewezen om de uitharding te verbeteren en vergeling te verminderen):
-
UV-parameters controleren: Zorg voor voldoende intensiteit (meestal 300-800 mW/cm²) en een belichtingstijd die past bij de dikte van de film (dunne films 3-5 sec, dikke films 8-15 sec) om "onderharden" te voorkomen.
-
Gebruik inerte uitharding: Gebruik indien mogelijk een inerte stikstofkamer. Dit elimineert zuurstofinhibitie aan het oppervlak, vermindert de aanmaak van vrije radicalen en verbetert de uitharding.
-
Spectrum luciferlamp: Zorg ervoor dat het emissiespectrum van de UV-lamp overeenkomt met het absorptiespectrum van uw fotoinitiator (bijvoorbeeld, TPO absorbeert bij 365-405 nm, gebruik een 365 nm of 405 nm LED-lamp). Dit zorgt voor een efficiënte initiatie en volledige uitharding.
6. Optionele oplossing: Optische witmakers toevoegen om lichte vergeling te compenseren
Als je een lichte vergeling hebt die niet volledig kan worden opgelost door de formulering te wijzigen (bijvoorbeeld bij kostengevoelige, low-end toepassingen), overweeg dan een Optical Brightening Agent (OBA). Dit lost de hoofdoorzaak niet op, maar geeft blauwe fluorescentie af om het geel optisch te neutraliseren, waardoor de coating helderder lijkt.
Aanbevelingen: Veel voorkomende OBA's zijn stilbeenderivaten en benzoxazoolverbindingen. Toevoegen bij 0,1%-0,3%. Let op: Spaarzaam gebruiken in functionele coatings (zoals optische lenzen) om te voorkomen dat fluorescentiemismatches de prestaties beïnvloeden.
IV. Samenvatting + praktische checklist: Snelle diagnose & toepassing
Mijn grootste les door de jaren heen: het oplossen van vergeling is nooit een "oplossing op één punt". Het vereist een holistische aanpak die bij elkaar past mechanisme + formulering + procesomstandigheden. Veel samenstellers hebben het moeilijk omdat ze zich richten op één ingrediënt terwijl ze het mechanisme en de omgeving negeren.
Voor een snelle diagnose en toepassing is hier een praktische checklist. Vergelijk je symptomen om de richting te vinden:
| Geel worden Oorzaak (mechanisme) | Chemische hoofdsoorten | Praktische oplossingen |
|---|---|---|
| Oxidatieve afbraak | ROO-, ROOH, aldehyden, ketonen | 1. Voeg antioxidanten toe. 2. Optimaliseer voor volledige genezing. 3. Gebruik stikstofinertisering. |
| UV-degradatie (Foto-oxidatie) | Chinonen, fenoxy radicalen | 1. Voeg UVA + HALS toe. 2. Schakel over op alifatische/cycloalifatische harsen. 3. Gebruik niet-vergelende fotoinitiatoren. |
| Amine oxidatie (NOx reactie) | Nitroso, nitroderivaten | 1. Vervang aromatische aminen door alifatische aminen. 2. Gebruik aminevrije systemen. 3. Verbeter de ventilatie in de werkplaats, verminder NOx. |
| Thermische degradatie | Geconjugeerde olefinen, carbonylen | 1. Gebruik thermisch stabiele harsen/additieven. 2. Lagere uithardingstemperatuur, proceswarmte regelen. 3. Vermijd gelijktijdige aanwezigheid van carbonyls en amines. |
| Additieve migratie/afbraak | Aromatische fragmenten, Oxidatiebijproducten | 1. Kies niet-aromatische additieven met een lage migratie. 2. Controleer de restgehaltes van additieven. 3. Gebruik ingekapselde reactieve groepen om migratie te minimaliseren. |
| Onvolledige genezing | Resterende vrije radicalen, monomeren | 1. Stel de parameters van de UV-lamp in voor grondige uitharding. 2. Stem de absorptie van de initiator af op de emissie van de lamp. 3. Restmonomeer tot een minimum beperken. |
V. Stof tot nadenken: Toekomstige richtingen in UV-bestrijding van vergeling (persoonlijke mening)
Door de toenemende eisen van sectoren met hoge prestaties (flexibele elektronica, lucht- en ruimtevaart) worden traditionele methoden om vergeling tegen te gaan soms zwaar belast om te voldoen aan de eisen voor weerbestendigheid op lange termijn, hittebestendigheid en hoge transparantie. Gebaseerd op recente experimenten en observaties uit de industrie, volgt hier een hypothese:
Integratie van "biomimetische anti-verouderingsstructuren" in UV-coatingformules zou een duurzamere antivergelingslaag mogelijk kunnen maken. Bijvoorbeeld door de hydrofobe, UV-blokkerende structuur van een lotusblad na te bootsen door biomimetische groepen in de harsmoleculaire keten op te nemen. Dit zou tegelijkertijd het binnendringen van UV en zuurstof kunnen blokkeren, de migratie van additieven verminderen en zowel de weerbestendigheid als de slijtvastheid verbeteren.
Ik ben momenteel bezig met experimenten en de eerste resultaten zijn veelbelovend: UV-coatings met biomimetische groepen vertonen >2x betere anti-vergeling dan traditionele formuleringen. Na 30 dagen intensieve blootstelling bleef de lichttransmissie boven 90%. Hoewel er nog steeds uitdagingen zijn, zoals hogere kosten en complexe verwerking, denk ik dat biomimetische anti-vergeling een mainstream richting zal worden voor high-end UV-coatings naarmate de technologie zich verder ontwikkelt.
Slotwoord: Laten we samenwerken en samen leren
Tot zover mijn 8 jaar durende overzicht van oplossingen voor UV-coatingvergeling - van mechanismen tot praktische stappen, van casestudies tot een diagnostische checklist. Elk punt is gebaseerd op geleerde lessen en gevalideerde oplossingen.
Eerlijk gezegd is UV-vergeling niet eng. Als je het mechanisme correct identificeert en je formulering en proces precies aanpast, kun je het helemaal oplossen. Ben je in je werk bijzonder lastige gevallen van vergeling tegengekomen? Of heb je vragen over een van deze oplossingen? Voel je vrij om hieronder commentaar te geven. Laten we discussiëren, samen leren en onze UV-coatings nog beter maken!
Meta Beschrijving
Ervaren scheikundige Starry deelt inzichten in de 5 belangrijkste mechanismen van UV-coating vergeling (met casestudies), waarbij oorzaken zoals oxidatie en fotodegradatie worden uitgesplitst. Biedt praktische oplossingen voor een combinatie van formuleringsaanpassingen en procesoptimalisatie, inclusief een selectiegids voor fotoinitiatoren en harsen. Helpt formuleerders en technici om problemen met vergeling op te lossen voor verbeterde duurzaamheid en helderheid.